Monday, December 2, 2013
Midori Monday : a huge list of Youtube videos
Just in case you were in need of inspiration, or you're wondering what the heck a Midori traveler's notebook actually is, or you need a Midori fix... the lovely Kate Bernasconi made a list of over 100 (!!) Youtube videos about Midori's and Fauxdori's.
Here you go, enjoy!
Thursday, November 28, 2013
Take a picture Thursday
Photography as a hobby is not new to me. In fact, my dad has always been an amateur photographer and even had his own dark room for a while. And in 2009, I did the Project 365 challenge, where you take one picture every day for a year.
I used a simple point-and-shoot camera for it, and although I had quite a few days where I had no idea what to take a picture of, I managed to finish the year and was very happy to take that very last picture.
Recently, I got a DSLR, the Nikon D3200, and I'm in the process of learning all there is to know about ISO's and F-stops and all the other fun stuff of 'coming out of automatic', watching far too many Youtube videos on photography and taking horrible test shots indoors because the weather is too icky to go out.
But, the other day I caught the morning light when it was still dry, and took some pictures of the scaffolding we still had up from having had some work done on our bedroom wall, both inside and out. The scaffolding was up for weeks, and just in case I'd miss it now that it's finally gone, I had to take some pics.
Monday, November 25, 2013
Fauxdori journal flip-through
When I made my 'Fauxdori' (a DIY version of the Midori Traveler's Notebook), I knew I wanted to use the inserts primarily as a written journal. Eventhough I've always included writing in my Art Journals, sometimes even with big sections of the journal being used for just written journaling, I missed having a journal where the emphasis is on writing.
So I made myself a little journal, and off I went.... strangely enough, without even thinking about it, I started writing in English. Even when writing about getting my passport at the Dutch Embassy in London, I only write a few words in Dutch here and there. Not really sure why...
Of course I could not just keep a plain journal with writing only, I had to include washi tape, Pogo printer pictures (mostly of the Fauxdori itself) doodles, notes on scrap bits of paper and daily ephemera. Being part of two Midori-groups on Facebook (an international one and a Dutch one) has only made my love for the simple yet perfect system grow more and more every day.
So, with apologies for the tripod not wanting to do its job today, here's the flip-through. Enjoy.
Monday, November 11, 2013
So I wanted to replace my paper beads on the Fauxdori....
...with one of these....
but which one? I narrowed it down to these few:
and then finally decided this should be the one:
It feels heavy and bulky, but it looks lovely on the brown of the leather. Love it love it love it!
(now.... I've got a proper Midori on my birthday wishlist, who knows what bead I'll put on that one....)
Saturday, September 14, 2013
My DIY Midori Traveler's Notebook
Sometime last year, I first heard of the Midori Traveler's notebook (Midori through a video Leslie did in making her own knock-off. I liked the system, it's very simple and clean and refillable, but right then, I had no time or even space to make one. I'd put it on the 'when we move I will..'-mental list I had been keeping.
Then sure enough a month or so ago, the Midoris started popping up in my Youtube list of suggestions. I suppose it had something to do with the Filofax videos I'd been watching, the two, although different systems, seem to go hand in hand rather well.
I rewatched Leslie's video, watched a couple of others including Ray Blake's, and ordered some leather on eBay..... which... of course... was not really suitable for this kind of project. It was far too thin and certainly not stiff enough, but I wanted to try and see if I could actually make a Midori style notebook, otherwise known as a Fauxdori.
I managed to, and filled it with notebooks, but I was still unhappy with the way the leather was curling up as you put the book down. Something had to be done about it. Google took me to this site and soon I was doing my own little experiments. I dunked a piece in hot just-boiled water and some washing-up liquid. Did not do much. I tried cheap perfume, thinking of urine used in the leather industry in the past. Didn't do anything other than making the leather smell of cheap perfum, duhhh... Glue worked, but left it feeling rough. Then I thought of Vanish Oxi Action, a stain remover you add to your washing powder. That did the trick!
So here it is, my Fauxdori:
Tuesday, August 20, 2013
Journal keeping.
Whether it is the Art Journaling tag, or my current Filofax obsession, I'm not sure, but I've been thinking a lot about journal keeping.
I got my first journal when I was a little girl, a few days before my 10th birthday. I started writing in it immediately and have since filled about 30+ diaries and notebooks with my (almost) daily writing. I stopped keeping a written diary as such when I discovered Art Journaling, but even my Art Journals are a chronological document of my life. That's almost 30 years of journal keeping in one way or another.
This morning I was reading Dispatch from LA and saw this video about a gentleman who's kept a journal since 1947. It's amazing just how much he's got in there, and that he's able to go back and find when exactly he met someone, or did something. Mine are not that detailed, and I certainly never had the discipline to keep up daily writing.
Friday, August 16, 2013
Filofax Friday #1: initial set-up
A few weeks ago, I started noticiting more and more videos on Filofax planners on Youtube. First Rhomany did one, and then Courtney did one, or the other way around, I forgot... They started me off watching many, many videos on the wonderful world of Filofax, and in the end, I just knew I had to get one...
After much research and keeping my budget in mind, I had my eye on a Finsbury on Amazon, so I ordered it. It was set to 'shipped' quickly, but a week later and just as I was about to contact the seller asking why my Filofax was taking so long, I got a note saying that sadly it was no longer in stock, but I could order another model for just £12 extra.... Hmmmm... fishy!!
So off to Staples I went and picked up the purple Saffiano in personal size instead!
In the video, you'll see me go through my Filofax, explaining things along the way. Enjoy!
For now, I'm happy with this set-up. I like the sections I have, and how I'm using them so far. I do not colour-code, but who knows, I might find myself using the same colours for the same items over and over and hey presto!, I'm colour-coding! We'll just have to wait and see what happens, as things have a way of developing on their own, so it seems.
And before I forget: this is where I got my little box of sticky notes, and the idea of Ta Da!-lists came from Mellamenia.
There. I think that's it for now. I'm sure you'll be seeing lots more Filofax Friday updates in the next few weeks.
Wednesday, August 14, 2013
Art Journaling Tag
(I know, I know, it's been far too long since I last posted something.. Summerlong and life in general got in the way - again. But I promise I'll post more often from now on, pinky swear!)
During Summerlong, Rhomany sent us a list of 20 questions about Art Journaling. Here are my answers:
Please feel free to answer any or all of the questions, I'm very curious to hear how you use your Art Journal.
Thursday, July 4, 2013
Index Card A Day - my June collection
I know it's July already (July! How did that happen??) but here is my June collection of Index Cards I've done for the ICAD-challenge. I have to be honest, most were done in sets, but I still managed to come up with 30 cards for the month which is what I was aiming for.
 These are two of my favourite cards:
 These are two of my favourite cards:
Tuesday, July 2, 2013
Gelatine printing
I know I'm late to the party, but I spent the afternoon gelating printing and had so much fun I had to share it here!
Yesterday I made a gelatine plate (please watch Linda Germain's videos on how to do that! She's got amazing tips and tricks, I learned a lot from her!) and then I got into a bit of a panic: I couldn't find my brayer. It wasn't with my other art stuff that was still in boxes since our move in December, but thankfully today I found it hidden away in box in the bottom of the wardrobe. Yeah, no idea either... But at least I could start playing! Within minutes, my testle table looked like this:
 And my hands looked like this:
 but it was so much fun!
Here are the results of my first go at gelatine printing:


 Lessons learned:
* Make masks out of thicker paper. Printing paper doesn't hold up and doesn't always show up.
* Hunt down more objects to make marks on the plate, although sequin waste is fun!
* Have thicker paper at the ready for printing. I now used printing paper, envelopes and index cards, next time I want to make paper I can use for collage.
* For best result, use ligher colours on the first layer, and darker on the layers after that. Not the other way around, unless you're using white.
Sadly I had to cut my plate down as it broke early on in the process, but that will not stop me playing again within the next few days. I have a couple of cards and tags that are begging for a second layer....
Yesterday I made a gelatine plate (please watch Linda Germain's videos on how to do that! She's got amazing tips and tricks, I learned a lot from her!) and then I got into a bit of a panic: I couldn't find my brayer. It wasn't with my other art stuff that was still in boxes since our move in December, but thankfully today I found it hidden away in box in the bottom of the wardrobe. Yeah, no idea either... But at least I could start playing!
 Within minutes, my testle table looked like this:
 And my hands looked like this:
 but it was so much fun!
Here are the results of my first go at gelatine printing:


 Lessons learned:
* Make masks out of thicker paper. Printing paper doesn't hold up and doesn't always show up.
* Hunt down more objects to make marks on the plate, although sequin waste is fun!
* Have thicker paper at the ready for printing. I now used printing paper, envelopes and index cards, next time I want to make paper I can use for collage.
* For best result, use ligher colours on the first layer, and darker on the layers after that. Not the other way around, unless you're using white.
Sadly I had to cut my plate down as it broke early on in the process, but that will not stop me playing again within the next few days. I have a couple of cards and tags that are begging for a second layer....
Friday, June 28, 2013
Some random pictures of the last couple of days
Makes you think the pilot was going 'Yeeeeeeeeehaaaaaaaaaaaaa!!!'
I've suddenly got varnishable nails! And I like dots...
First full moon in ages that didn't cause a sleepless night...
These American types ain't scared!
I've suddenly got varnishable nails! And I like dots...
First full moon in ages that didn't cause a sleepless night...
These American types ain't scared!
Wednesday, June 26, 2013
Thursday, June 13, 2013
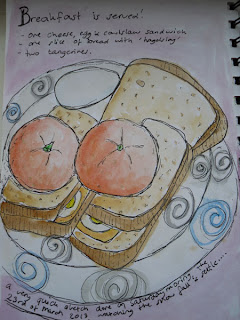
Strawberries, or: an Inspiring Breakfast.
Breakfast can be so inspiring, especially when you're having strawberries. I had to draw them...
But why stop with just one drawing in your sketchbook? I decided to also do my Index Card for today on strawberries...
Strawberries on their own are delicious of course, but I prefer them on 'beschuitjes', sold here in the UK as 'Dutch crisp bakes' and available in most supermarkets. Butter your beschuit, cut up your strawberries and sprinkle a little bit of sugar on top. Yummmm!!
And of course I had to get my Colour Journal out and record the colours I had used.
And then it was fiiiiinally time to have breakfast. I hope you enjoyed yours as much as I did mine!
Tuesday, June 11, 2013
Vlog - getting the 'blah blah blah' out...
I was filming my intro to my month on Summerlong, but was making no sense at all... so I decided to do a little vlog to get all that blah blah out...
Did it work? Well, if you've signed up for Summerlong you'll see!
Sunday, June 9, 2013
The ugly page
The other day, I was going through my Flickr account and stumbled across the pictures I took at the petting zoo in the park. I decided to use them as reference photos for a page in my sketchbook.
I kind of fancied drawing the goose. Now, of course I could have picked this picture but instead I chose the one with the funny angle, this one:
I was going to make this beautiful sketch, use amazing colours, put a border around it and fill the rest of the page with text on what a lovely day it had been in the park and what an inspirational model this goose was... when...
Well, as you know I work in pen. Pen isn't very forgiving. A line that you put down is permanent, there's no going back. So when I drew the beak too small, all I could do was add a little more. And then more, and then some more. I did what I could to try and indicate the back of the head, to do something about that eye that I had made to look possessed.
It did not help. The goose still looked like a penguin on speed. It was a disaster.
I could have ripped the page out, I could have scribbled all over the silly looking goose, I could have simply turned the page and started again. Instead, I used my watercolours best I could, and then got my pen out again. I wrote, 'And here it is, the Ugly Page.' I filled the rest of the page writing about the goose, and how the drawing came out a disaster.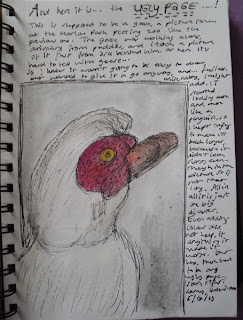 And guess what... I kinda like it now.
Embrace your Ugly Page, even if you do a whole sketchbook full of them.
I kind of fancied drawing the goose. Now, of course I could have picked this picture
 but instead I chose the one with the funny angle, this one:
I was going to make this beautiful sketch, use amazing colours, put a border around it and fill the rest of the page with text on what a lovely day it had been in the park and what an inspirational model this goose was... when...
Well, as you know I work in pen. Pen isn't very forgiving. A line that you put down is permanent, there's no going back. So when I drew the beak too small, all I could do was add a little more. And then more, and then some more. I did what I could to try and indicate the back of the head, to do something about that eye that I had made to look possessed.
It did not help. The goose still looked like a penguin on speed. It was a disaster.
I could have ripped the page out, I could have scribbled all over the silly looking goose, I could have simply turned the page and started again. Instead, I used my watercolours best I could, and then got my pen out again. I wrote, 'And here it is, the Ugly Page.' I filled the rest of the page writing about the goose, and how the drawing came out a disaster.
 And guess what... I kinda like it now.
 Embrace your Ugly Page, even if you do a whole sketchbook full of them.
Saturday, June 8, 2013
First week of ICAD 2013
Here are my first 7 index cards for this year's ICAD. And no, I did not do them every day, but did these in 4 sittings.
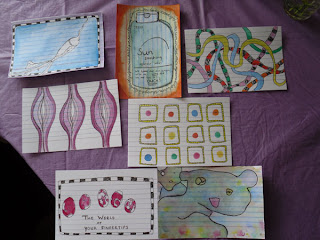 I'll be putting the individual pictures on my Flickr page (including some of my old index cards), hopefully I'll get a full set this time...
 I'll be putting the individual pictures on my Flickr page (including some of my old index cards), hopefully I'll get a full set this time...
Saturday, June 1, 2013
Index Card A Day - ICAD
Now, I've done this before (link has videos! go check it out!) and did not finish the challenge, but that's not to say it's no fun:
Index Card A Day is starting today!
For the months of June and Juli, Daisy Yellow challenges you to do something creative with or on an index card. They cost next to nothing, so you don't have to feel too precious about them, and you can draw on them, write poetry or single words or shopping lists on them, doodle on them, sew them, stick stuff on them, cut shapes out of them...
If you feel up to the challenge, go to Daisy Yellow's ICAD FAQ page and join in! I will try and do my best to do a card every day, but seeing how I feel about doing anything daily, I'll make sure I have 7 cards each week. Pinky swear.
And here is my first card: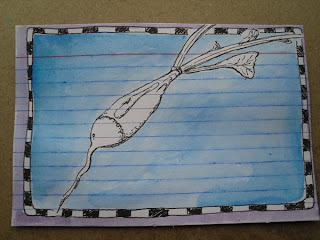 (Oh come on, you knew it was going to be a radish, right?)
Index Card A Day is starting today!
For the months of June and Juli, Daisy Yellow challenges you to do something creative with or on an index card. They cost next to nothing, so you don't have to feel too precious about them, and you can draw on them, write poetry or single words or shopping lists on them, doodle on them, sew them, stick stuff on them, cut shapes out of them...
If you feel up to the challenge, go to Daisy Yellow's ICAD FAQ page and join in! I will try and do my best to do a card every day, but seeing how I feel about doing anything daily, I'll make sure I have 7 cards each week. Pinky swear.
And here is my first card:
 (Oh come on, you knew it was going to be a radish, right?)
Need inspiration? Grow radishes!
So I grew some radishes. First in my window, and then I planted them outside.
Now, if you know British weather, you can guess what happened... They grew like crazy! And before I knew it, I had to take some out as my veggie grow bag was getting too crowded.
Talk about kill your darlings... most of them were not more than a slightly thicker stem, and not edible yet. But a few of them were and they were lovely! Even quite peppery, which is what I like about radishes.
But of course, before I ate them all, I had to draw one...
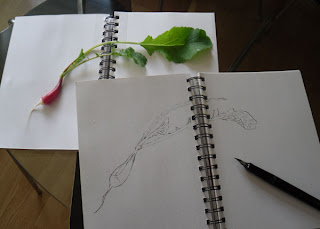
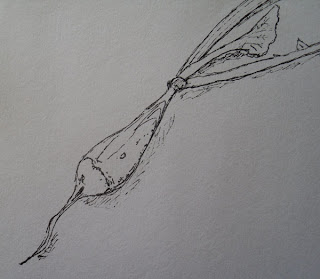
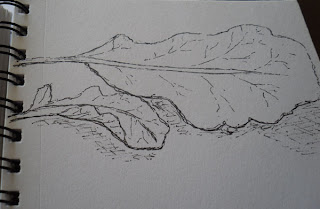 First I did a line drawing with my Lamy safari fountain pen. It's filled with waterproof calligraphy ink that's non-clogging.
Then I added colour, using my Winsor & Newton Cotman studio set. I've been trying to remind myself to use this one, as I often use cheaper paints. This set is quite large, and I haven't really played that much with it yet so I'm learning about mixing the colours as I go along.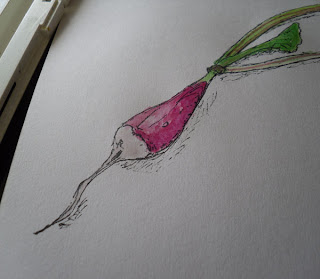
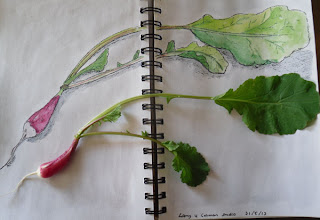 And this is the full sketch. I'm not sure yet if I will add text. I'm tempted to, because I'd like to write about my very first radishes, but I'm afraid of messing it up. Maybe I'll do a mock-up so I can see what it looks like, or cut out some clear plastic as an overlay where I can put text blocks up to try it out....
What unusual things have you been drawing lately?
Talk about kill your darlings... most of them were not more than a slightly thicker stem, and not edible yet. But a few of them were and they were lovely! Even quite peppery, which is what I like about radishes.
But of course, before I ate them all, I had to draw one...


 First I did a line drawing with my Lamy safari fountain pen. It's filled with waterproof calligraphy ink that's non-clogging.
Then I added colour, using my Winsor & Newton Cotman studio set. I've been trying to remind myself to use this one, as I often use cheaper paints. This set is quite large, and I haven't really played that much with it yet so I'm learning about mixing the colours as I go along.

 And this is the full sketch. I'm not sure yet if I will add text. I'm tempted to, because I'd like to write about my very first radishes, but I'm afraid of messing it up. Maybe I'll do a mock-up so I can see what it looks like, or cut out some clear plastic as an overlay where I can put text blocks up to try it out....
What unusual things have you been drawing lately?
Sunday, May 5, 2013
Grow your own
Growing up, my paternal grandparents grew their own vegetables. A large part of their garden was their vegetable patch, and us kids were not allowed in without my grandmother there. I remember us getting cabbages, beans and especially bundles and bundles of rhubarb wrapped in newspaper, which would mean my mum would cook rhubarb compote, which I loved.
My parents also had an allotment for a while. I remember me and my sister getting water from a little pump, and picking gooseberries straight from the bush, and carrots straight out of the ground, although my mum would make us wash them first.
Now I don't have a big garden, or even an allotment, but I do have a small balcony and decided to have a go at growing my own veggies there. It's just raddishes, lettuce and carrots, as I haven't got more space, but it's something. Let's just keep my not-so-green thumbs crossed that they'll do alright and I'll be able to have a nice salad this summer!


Thursday, May 2, 2013
So we have a new King
As most of you know, I'm Dutch but living in the UK. I think I have adjusted pretty well, I say 'sorry' when someone bumps into me, I put salt and vinegar on my chips and I know which way to look first when crossing the road. But there are some days when I feel very Dutch...
On 30th April, our Queen Beatrix abdicated. She had been Queen for 33 years and decided that was long enough and it was time for her son to take over. We had not had a King since 1890, so it's all new and exciting. Amsterdam turned orange, our national colour as the Royal Family is 'Van Oranje Nassau', and aside from all the Royal guests and all the protocol and official business, it was party-time!
Thankfully, I could watch it all online, live as it happened, on a special Youtube channel that was 'on air' for 14 hours straight. I got to see Beatrix sign the official document, saw the new King's daughters wave at the crowd, and enjoyed the concert that was being held at Museumplein, right next to Masterpieces by Rembrandt and Van Gogh and so many more Dutch painters.
Of course I had to do an Illustrated Journal-page myself. It's the kind of thing I'll be doing for Summerlong, the online art retreat, too... (You can still sign up and join the fun!)

Saturday, April 20, 2013
Monday, April 15, 2013
Summerlong - a virtual art retreat
Have you ever found yourself drooling over art retreat announcements, but thought to yourself it's impossible to go there?
Because they are too far away, or too expensive, or you couldn't possibly get time off work or find someone to babysit your pet goldfish?
The lovely Rhomany of Rhomany's Realm has created the solution: a Summerlong class, which will be held from May to September, and it's online, so you don't even have to dig out your passport! She asked six of her arty friends in Britain to take anyone who enrolls on a daytrip, and then create art from all the inspiration found when out and about.
And the best thing yet.... She asked me to be part of it! I'll be taking you for a walk in my new town, showing you all the sculptures we have here and then taking you back home to draw. Or... if I get really brave, I might even draw on site... But I haven't decided yet. ;)
The class will run from May 1st to September 30th, and there's an early bird sign-up fee of £50/$75 until May 8th. (regular price £55/$83)
Follow this link, and tell Rho I sent you by putting 'Eveline' in the message box.
I'm so so sooooo excited!! Hope to see you there!
Subscribe to:
Comments (Atom)


