Friday, February 26, 2010
And sold!
Less than 24 hours after listing this necklace in my Artfire shop it was sold! I'm am sooo happy and soooo proud! Thank you so so much lovely buyer!
And now you'll have to excuse me, I've got some more listing to do!
Thursday, February 25, 2010
ArtFire! Get your freebie here!
I finally did it! I listed not one, but two items in my brand spanking new ArtFire shop!!
Please go and have a look and let me know what you think! Oh, and if you purchase one of my items and mention my blog, you'll get a little something extra! That's how thrilled I am!
Thursday, February 18, 2010
Thursday, February 11, 2010
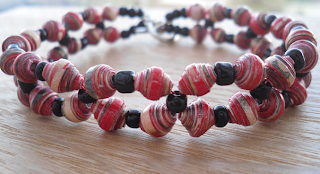
And then they were bracelets
I searched for a project to do with my cute little beads that I've been showing off in my previous post. I did some white-and-gold ones too, which I thought would look great with the red ones I did. But I didn't want to just string them and be done with it.
Thankfully, there is always Paper Beads for inspiration. Two weeks ago Janice posted this tutorial and here are my results:
I'm not too sure about this one. I reallllyy liked the multi-coloured beads when they were just on the string of elastic cord I had them on. I kept looking at them, wondering what to do with them, because I loved them so much. I'm not sure if the blue is the right blue. But then again, maybe it will just take a bit of getting used to. At least they are great with jeans now!
This one I think came out best of all. I normally don't care for gold that much, but I think it works here.
I really like the pattern and will be making more of these. At least a green one, maybe a green and white one, and who knows what other colours. As they say: watch this space!
Tuesday, February 9, 2010
Sunday, February 7, 2010
And Handmade Art Journal no. 3
I did it I did it I did it! A 3 (threeeee!) signature book! And I wasn't overwhelmed or scared or anything!
Let's look at the pictures first:
Now I decided to do the spine in white duct tape instead of fabric, which was fine until the cover came out of the flower press. It turns out you can't glue to duct tape. So the edges of where I had collaged my DIY-paper were coming off. I needed to put an extra layer of duct tape. No problem
And then it was time to measure out where to put the holes and where to score the actual spine. You can't write on duct tape. Everything would come off, even Sharpies. Sooo... I stuck a strip of masking tape on the inside of the cover, and measured there. I punched my holes and took the masking tape off. Perfect! (well, not perfect, rather off actually, but hey, this is my first attempt and I'm not going to complain!)
Next 'problem': white dental floss on white duct tape. Solution: markers! It was just a fluke, but it turns out you can colour dental floss with markers. It stains like nothing else, but who cares, right?
And then it was time to sew. The first signature was done without any problem. I then, following Leslie's instructions, went over the fold again with my wooden replacement for a bonefolder. I started working on the second signature, but the first one did not want to stay folded back like it should be. So I clamped the pages to the cover. And then it went just fine!
I am sooo happy with the result. I never-ever thought I could do this, I always figured that it would be far too complicated, and that I'd get confused and stick the needle in the wrong holes etc. etc., but Leslie's instructions have helped so much!
If you ever wanted to try bookbinding and are looking for a beginner's workshop, I highly recommend Leslie Herger's down to earth, easy to follow, no-nonsense (no singing, no dressing up, no talking to puppets or animals) workshop. Please go here and have fun!
Handmade Art Journal no. 2
And here is the second Art Journal I made following Leslie's instructions on Artjournaling Ning.
This was using the Machine Stitch, which is difficult to see because I used dental floss again. So note to self: use thicker thread and maybe two colours instead of just white. But for a first attempt I quite like it.
Thursday, February 4, 2010
60 Inch necklace!
That 60 inch necklace I said I wanted to make? I finally did it.
The paper beads are made of black wrapping paper with silver stars on it that my sister used for our Christmas presents. I combined them with glass beads and see-through seed beads.
Now all I need is a party to go to so I can show this necklace off!
The paper beads are made of black wrapping paper with silver stars on it that my sister used for our Christmas presents. I combined them with glass beads and see-through seed beads.
Now all I need is a party to go to so I can show this necklace off!
Subscribe to:
Posts (Atom)